Python mocking explained & visualized

You want to use Python’s unittest.mock library to test your code? Great idea. Let me explain the basics with examples and visuals.

What is mocking?

Mocking (or patching) is the process of replacing parts of your code (“stubbing”) during unit testing in order to:

a) Focus your tests; making sure each tests checks one specific thing
b) Test that your callables (functions/classes) are called the way you expected

The most common library in Python land is the builtin library unittest.mock. There are alternatives like flexmock but I will not be focussing on those.

What is a Mock?

We will be stubbing parts of our code and replace those parts with Mock objects. What exactly is this object?

Mock is a very flexible object. You can call it in all kinds of ways, assign attributes, look up attributes, and it will not complain.

Let me give you a few examples:

In [1]: from unittest.mock import Mock

In [2]: m = Mock()

In [3]: m()
Out[3]: <Mock name='mock()' id='4492582136'>

In [4]: m()()()
Out[4]: <Mock name='mock()()()' id='4492723144'>

In [5]: m.foo()
Out[5]: <Mock name='mock.foo()' id='4492606320'>

In [6]: m.bar().baz.xyz()
Out[6]: <Mock name='mock.bar().baz.xyz()' id='4493125280'>

In [7]: m.foo
Out[7]: <Mock name='mock.foo' id='4492606768'>

In [8]: m.foo = 'bar'

In [9]: m.foo
Out[9]: 'bar'

It’s capable of a lot more, but we’ll get to that in a bit.

Mocking basics

Let’s see how mocking works in practice.
Here is a part of our code base:

# app/utils/my_module.py

def greet(name):
    print(f'Hello, {name}')

def greet_group(group):
    for name in group:
        greet(name)

Let’s show how patching works and what it looks like.

# app/utils/tests/test_my_module.py

from unittest.mock import patch
from app.utils.my_module import *


def test_greet_group_without_patch():
    greet_group(['Bob', 'Alice'])

def test_greet_group_with_patch():
    with patch('app.utils.my_module.greet') as mock_greet:
        greet_group(['Bob', 'Alice'])

The test output will look like this (I’m using pytest):

app/utils/tests/test_my_module.py::test_greet_group_without_patch
Hello, Bob
Hello, Alice
PASSED
app/utils/tests/test_my_module.py::test_greet_group_with_patch 
PASSED

Notice that

  • First test, without patching, shows that greet is being executed, twice.
  • Second test, with patching, shows that it isn’t.

I promised that this was going to be a visualized explanation, so let me try to clarify using a drawing:

Diagram 1

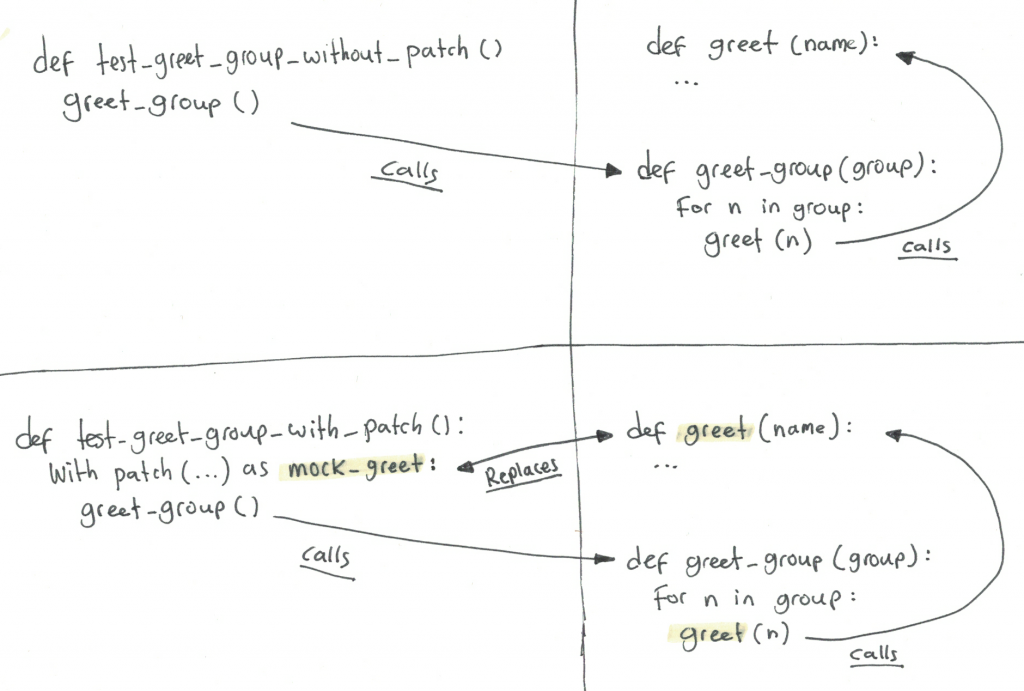
I hope that clarifies it a bit. Now, obviously these tests are not doing anything useful. Let’s add an assertion. If we were to examine the mock instance after running test_greet_group_with_patch, we would be able to see the calls to the instance:

(Pdb) mock_greet
<MagicMock name='greet' id='4461253688'>
(Pdb) mock_greet.call_args_list
[call('Bob'), call('Alice')]

This proves that mock_greet received two calls, one with argument Bob, one with Alice.

Mock objects have built-in assertion methods. For this test case, we will be using assert_any_call, which will check if the Mock object was called with the given argument.

def test_greet_group_with_patch():
    with patch('app.utils.my_module.greet') as mock_greet:
        greet_group(['Bob', 'Alice'])

    mock_greet.assert_any_call('Bob')
    mock_greet.assert_any_call('Alice')

Mock offers several call assertion methods, including assert_called_once_with, which is the one I use most frequently.

Return values and side effects

When using mocks, you are usually replacing (stubbing) callables. Let’s go over the basics:

  • A callable is an object which can be called. This will usually be a class, function or method.
  • A return value is the thing that calling that object returns.
  • In Python (and other object oriented languages), a callable can return another callable.
  • A side effect is something the callable does that has effect on the world, but it is not the return value.

A Mock’s return_value attribute is equal to the result of calling it. Arguments are ignored:

In [2]: m  = Mock()

In [3]: m() is m.return_value
Out[3]: True

In [4]: m('test') is m.return_value
Out[4]: True

In [5]: m()() is m.return_value.return_value
Out[5]: True

Time for examples. The following example code contains a class, a method and a function that instantiates the class and calls its methods:

class FooClient():
    def login(self):
        pass

    def foo(self, arg):
        pass


def do_foo():
    foo_client = FooClient()
    foo_client.login()
    foo_client.foo('bar')

This test patches the complete client and is going to test the do_foo function:

def test_do_foo():
    with patch('app.utils.my_module.FooClient') as mock_foo_client:
        do_foo()

    breakpoint()

But for now, let’s jump in the debugger to show how to use the return_value attribute.

# Yes, this is the mock of FooClient:
(Pdb) mock_foo_client
<MagicMock name='FooClient' id='4545390016'>

# It has been called, once, with no arguments.
# This shows the instantiation of the class.
(Pdb) mock_foo_client.call_args_list
[call()]

# Its return value, the class instance, has a callable "login" 
# which has been called, once, with no arguments:
(Pdb) mock_foo_client.return_value.login.call_args_list
[call()]

# Its return value's callable "foo" has been called too,
# once, with argument "bar":
(Pdb) mock_foo_client.return_value.foo.call_args_list
[call('bar')]

Extending the test to assert these calls could look like this:

def test_do_foo():
    with patch('app.utils.my_module.FooClient') as mock_foo:
        do_foo()

    mock_foo.assert_called_once_with()
    mock_foo.return_value.login.assert_called_once_with()
    mock_foo.return_value.foo.assert_called_once_with('bar')

Let’s try to visualize this:

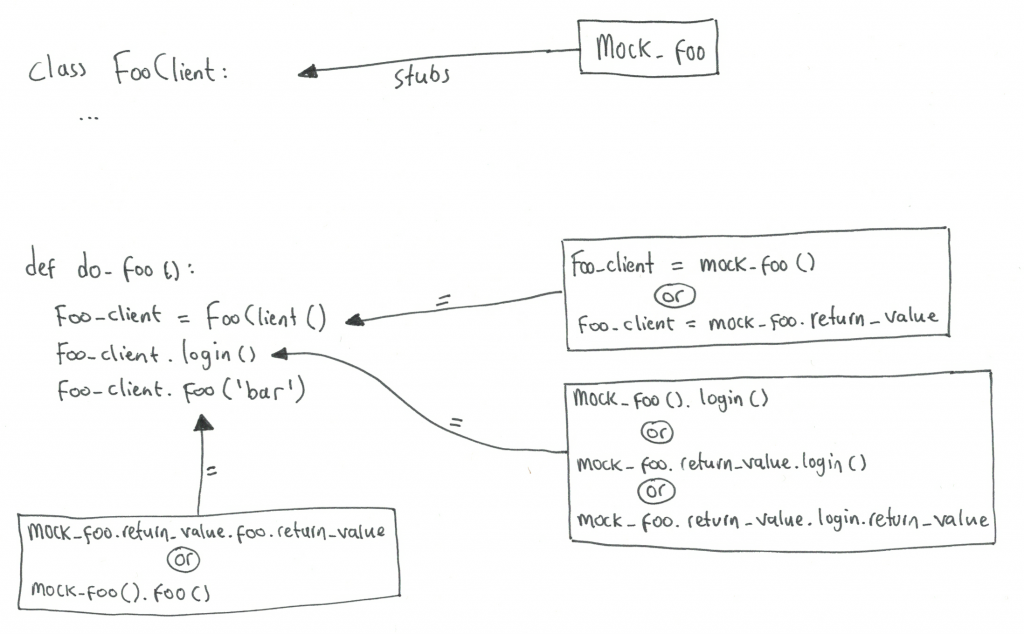
[ work in progress ]

Graphing energy usage with Python and a Raspberry Pi

For the last few years I’ve been tracking my household energy usage: entering meter readings every few weeks into a spreadsheet and (naturally) graphing them.

When my electricity and gas meter were replaced by smart meters, it opened up new possibilities of tracking my household energy usage. I bought a USB to P1 cable, used it to hook up a Raspberry Pi to my smart meter, and wrote some code.

Most smart electricity meters deployed in The Netherlands are equipped with a “P1 port”, identifiable as a RJ11 input port. It allows you to poll usage data over a serial interface.

“Dumb” electricity meters are being rapidly replaced by smart ones throughout the NL, and gas meters are replaced by smart units that communicate (some wirelessly) with the main electricity meter. The main meter is equipped with a GPRS module. This allows your energy provider to remotely monitor your power usage. The P1 port allows you to connect retail monitoring devices like TOON to very granularly monitor your energy usage.

I love what the people at TOON have created and I might buy their product in the future, but for now I figured it would be a nice hobby project to build some software to gain insight into my energy usage.

In the case of my smart meter, new datapoints are being broadcasted every ten seconds. That looks like this:

$ minicom -D /dev/ttyUSB0

1-3:0.2.8(50)                                       
0-0:1.0.0(181109155853W)                            
.1.1(4530303435303033383938363835313137)            
1-0:1.8.1(000837.445*kWh)                           
1-0:1.8.2(000932.493*kWh)                           
1-0:2.8.1(000000.000*kWh)                           
1-0:2.8.2(000000.000*kWh)                           
0-0:96.14.0(0002)                                   
1-0:1.7.0(00.088*kW)                                
1-0:2.7.0(00.000*kW)                                
0-0:96.7.21(00003)                                  
0)                                                  
1-0:99.97.0(0)(0-0:96.7.19)                         
1-0:32.32.0(00003)                                  
1-0:32.36.0(00000)                                  
0-0:96.13.0()                                       
1-0:32.7.0(233.0*V)                                 
)                                                   
1-0:21.7.0(00.088*kW)                               
1-0:22.7.0(00.000*kW)                               
0-1:24.1.0(003)                                     
0-1:96.1.0(4730303339303031373535393337383137)      
0-1:24.2.1(181109155504W)(00996.992*m3)             
/XMX5LXXXXXXXXXXXXXXX

The values we’re looking for are:

0-1:24.2.1  : Total gas usage in m3
1-0:1.7.0   : Current electricity usage in kW
1-0:1.8.2   : Total high rate electricity usage in kWH
1-0:1.8.1   : Total low rate electricity usage in kWH

The first thing I did was write a data collector. Initially, as a proof of concept, I simply wrote down the values in JSON format into a text file. Later on, I added SQlite support in order to be able to query the data.

The next step was adding a simple web interface and graphing the data. I used the Flask framework to write a simple web service and the excellent library Chart.js to create graphs.

Current status:


Future plans:

  • Intuitive touch interface instead of interval*datapoints input fields
  • Add possibility of graphing specific periods
  • Aggregate power datapoints
  • Add a dashboard with multiple graphs (e.g. weekly, daily and different averages)
  • Graph energy production (from PV panels)
  • Pattern detection

Like Linus says: “Talk is cheap. show me the code.” Check out the GitHub repository if you’re interested.


Priority routing/queuing with Celery

When you’re using the Celery task scheduler in your Python project, especially when scheduling lots of tasks, it can be useful to implement priority routing.

The most common use case is probably adding a high-priority queue adjacent to the default queue, but you could just as well invert this and add a low-priority queue. Or both.

Implementation is simple.

Make sure this setting is enabled (it should be by default):

CELERY_CREATE_MISSING_QUEUES = True

Configure the name of your non-default queue somewhere:

CELERY_PRIO_QUEUE = 'my-high-priority-queue'

Define task routes. There are two ways of doing this. I prefer setting the route on the task definition.

When using the @task decorator:

@task(queue=settings.CELERY_PRIO_QUEUE)

When using class based tasks:

class MyTask(Task):
    queue = settings.CELERY_PRIO_QUEUE

The other way is using a setting:

CELERY_ROUTES = {'myapp.tasks.mytask': {'queue': CELERY_PRIO_QUEUE}}

Now, this is important. These routes will only be used when your tasks are being executed asynchronously (e.g. using apply_async). Periodic tasks will still be scheduled on the default queue. This “feature” has cost me a few hours of debugging.

For your periodic tasks (when using celerybeat), don’t forget to define queues for those as well:

CELERYBEAT_SCHEDULE = {
    'my-task': {
        'task': 'myapp.tasks.mytask',
        'schedule': crontab(minute='*/10'),
        'options': {'queue': CELERY_PRIO_QUEUE}
}

The final step is consuming your additional queue(s). A celery worker can consume one or more queues like this:

celery worker -A myproject -Q queue1
celery worker -A myproject -Q queue1,queue2

All set. Happy scheduling!

Squashing two apps in Django

When moving logic between apps in your Django project, you will usually encounter one impediment: the models.

Moving your models from one app to another app is a bit of a hassle, but there are several ways to do it. This is probably the best way, but you can find several methods on the web.

What these methods have in common is the fact that both apps will stay in the project. So what if we want to squash two apps into one, effectively deleting one app, including its migrations?

The following approach has been tested on Django 1.8.

Case: App A will be moved into App B

Problems to solve:

  • Migrations need to keep working, both on existing deployments and on new (local) deployments.
  • All migrations should be executable from start to finish on a new environment.
  • The migration state of App A’s models should be appended to App B’s state.
  • The migration state of App A needs to be cleaned up.

Renaming tables or not?

One variable in the approach below is whether you want to rename you existing database tables or not. As you might know, Django has a way of converting your model names to database tables in the format of “myapp_my_model, where app “myapp” its model class is named “MyModel”.

You can “pin” the database name by setting the db_table Meta attribute on your models.

Arguably, when moving App A’s models into App B, it’s not very clean if the actual database tables will stil be prefixed with ‘appa’ and ideally the database tables will be renamed. However, renaming database tables can be risky when they have relations, as most tables tend to have.

Renaming the tables using Django migrations is outside the scope of this post, so please refer to Google on how to do that.

Step 1

  1. Add ‘db_table’ definitions to your model Meta classes in App A. Make sure they’re equal to the current table names.
    class MyModel(models.Model):
        class Meta:
            db_table = 'appa_my_first_model'
  2. Don’t forget to run makemigrations. It will generate a new migration that will not actually change anything when executed, but it’s necessary to update Django’s migration state.
  3. Now, move all code except the models and migrations from App A to app B. Obviously, merge any code that needs merging, like views and urls.
  4. In App B’s models.py, import all App A’s models. Update all model imports throughout your project, and make sure that there are no imports from App A (You could also do this part at the end).
  5. Run your migrations.

Step 2

When you’ve chosen to rename your tables, this is where you should do it (by changing the db_table entries) and create a migration.

We will now remove App A’s tables from Django’s migration state using a state migration.

  1. Create a new empty migration in App A: ./manage.py makemigrations --empty
  2. Edit the new migration and refer to the next example. Note the SeparateDatabaseAndState operation where we tell the migration runner not to make any database changes.
    from django.db import migrations, models
    
    class Migration(migrations.Migration):
    
       dependencies = [
           ('appa', 'xxxx_auto_xxxxxxxx_xxxx'),
       ]
    
        state_operations = [
            migrations.DeleteModel('MyFirstModel'),
            migrations.DeleteModel('MySecondModel'),
        ]
    
        operations = [
            migrations.SeparateDatabaseAndState(
               database_operations=None,
               state_operations=state_operations)
        ]
  3. Move App A’s models to App B and create an automatic migration for App B (./manage.py makemigrations appb)
  4. Edit App B’s new state migration for App B. Edit the following items:
    1. Add dependency on App A’s final migration.
    2. Rename operations list to state_operations
    3. Add new operations list:
      operations = [
          migrations.SeparateDatabaseAndState(
              database_operations=None,
              state_operations=state_operations)
      ]
  5. Run the migrations, but make sure to use --fake-initial.

Step 3

The hardest part is over!

  1. Edit App B’s last migration (the one you just created):
    • Remove App A’s dependency from App B’s last migration
      • If App B’s last migration is an initial migration, just keep the dependencies list empty.
      • Otherwise, point to App B’s second-last migration.
  2. Remove the operations list and rename state_operations back to operations.
  3. Remove everything that’s left of App A.
  4. Disable App A in your project settings.

Done!

Scraping with Selenium and Python

If your goal is web scraping using Python, there are several great libraries you can use, like RoboBrowser, BeautifulSoup, and most notably, Scrapy. The downside of all those libraries is their lack of support for JavaScript. If any of the pages you want to scrape depend on JavaScript code execution, you are out of luck. This is where Selenium (or: WebDriver) comes in handy.

Selenium is basically a browser automation framework. With Selenium, you can programmatically control a browser. I big use case for this is UI testing or integration testing, but it’s just as well usable for scraping.

My first (personal) project using Selenium was building an automated bidding robot for certain online bidding sites. After that I’ve used Selenium on several custom scraping projects. I’ll share some insights I’ve gained from these projects.

Which browser to use

Assuming you are running Linux, the two main choices are Mozilla Firefox and Google Chrome (or Chromium). A third option is Opera (but let’s be honest, who still uses Opera).
Both Firefox and Chrome support WebDriver, but there are some caveats.

  • Google Chrome (and Chromium) contains a bug that renders the browser instance unusable after a TimeoutError is thrown. This might sound sensible, but be aware that a timeout can occur any time a web page does not reach 100% readiness. Any JS still executing? Timeout. Waiting for (external) assets? Restart the browser. Firefox, on the other hand, will raise the same exception, but it can safely be ignored.
  • From Firefox 48 on, Mozilla have dropped WebDriver support… Mozilla is working on their own builtin alternative, called Marionette. Mozilla offers an adapter-like tool called Geckodriver which allows you to use Marionette through the WebDriver interface, but (currently) the support is far from complete. One option is to use Firefox 45 ESR (long term support) instead. Another option is to use native Marionette instead, but the client does not support Python 3 (a huge sin, in my opinion).
  • Do you want to run a headless browser? You can use PhantomJS with Ghostdriver. Unfortunately, PhantomJS is not being actively maintained, so you risk using an outdated JS engine.
  • If you are using Firefox, there are a few tricks to make it run faster:
    profile = webdriver.FirefoxProfile()
    
    # Prevent loading of default page
    profile.set_preference("browser.startup.homepage_override.mstone", "ignore")
    profile.set_preference("startup.homepage_welcome_url.additional", "about:blank")
    
    # Don't load images
    profile.set_preference("permissions.default.image", 2)
    
    # Prevent waiting for full page loading
    profile.set_preference("webdriver.load.strategy", "fast")
    
    # Increase persistent connections
    profile.set_preference("network.http.max-persistent-connections-per-proxy", 255)
    profile.set_preference("network.http.max-persistent-connections-per-server", 255)
    profile.set_preference("network.http.max-connections", 255)
    
    # Kill long-running scripts
    browser.set_script_timeout(10)
    
  • Chrome has built-in Flash support. If for some reason you need Flash (I hope you won’t), when using Firefox you’ll have to explicitly install it.

Running headless

Or: Running Selenium on a server. As mentioned before, PhantomJS is a headless browser that can be used with Selenium. However, it’s pretty trivial to run Firefox or Chrome headlessly on Linux using Xvfb (X virtual framebuffer).

You can set this up manually, or use the handy Python wrapper PyVirtualDisplay. Check out this example code:

from pyvirtualdisplay import Display
display = Display(visible=0, size=(1920, 1080))
display.start()
# A virtual display is now running on a free port like 1001 (consult the display.display property to check the actual screen port).
# A new browser instance will automatically use the first available display, so just start a browser.
# Don't forget to stop the display after usage
display.stop()

If you want to check out what is actually going on inside your display, there are several options.

Option 1: Take a screenshot of the virtual display using ImageMagick’s “import” tool:

import subprocess
subprocess.check_call(["/usr/bin/import", "-window", "root", "-display", ":" + str(display.display), "-screen", "/path/to/output.png"])

Option 2: Run a VNC server inside the virtual display, like x11vnc:

apt-get -y install x11vnc
x11vnc -forever -display :1001

Now use a VNC client to connect to localhost:5900.

To Be Continued.

Building a fast config parser for large files

Recently I was asked to develop a config parser, or more specific, a config converter, in Python. The purpose of this tool was to parse a particular config file and feed it into an API. This relatively simple task was complicated by a few parameters:

  • The input file sizes are in the range 10-15G
  • The input is a undocumented proprietary format
  • The output needs to be inserted in a certain order because of dependencies
  • This process needs to be as fast as possible

This is a broad overview of how I attempted to solve some of these issues.

Continue reading “Building a fast config parser for large files”